Cellini is a stitch that I've struggled with. It just seems so wonky when I'm beading it that I'm constantly questioning if I've got the right bead size and whether I'm on to the next row?

 Recently my beady friend Linda was using a pattern that seemed more my speed ... well at least it is flat and somewhat less wonky. So it has that going for it. This actually is just straight up peyote, but you are switching the bead sizes from 6s, to 8s, to 11s, to 15s. So pretty wide range which is what makes this pattern look like Cellini. The original Cellini spiral stitch is a sculptural peyote beaded into a self-supporting tube. Kind of like a carved column, or how the stitch was named.
Benvenuto Cellini is who the stitch is named after. He is a 16th century Italian artist best known for his sculpture of Perseus holding the head of Medusa (left). Apparently the beaders who created this stitch thought the pattern looked like spiral columns they thought were in the Sistine Chapel. Virginia Blakelock and Carol Perenoud of Beadcats are said to be the beaders who named the stitch.
Recently my beady friend Linda was using a pattern that seemed more my speed ... well at least it is flat and somewhat less wonky. So it has that going for it. This actually is just straight up peyote, but you are switching the bead sizes from 6s, to 8s, to 11s, to 15s. So pretty wide range which is what makes this pattern look like Cellini. The original Cellini spiral stitch is a sculptural peyote beaded into a self-supporting tube. Kind of like a carved column, or how the stitch was named.
Benvenuto Cellini is who the stitch is named after. He is a 16th century Italian artist best known for his sculpture of Perseus holding the head of Medusa (left). Apparently the beaders who created this stitch thought the pattern looked like spiral columns they thought were in the Sistine Chapel. Virginia Blakelock and Carol Perenoud of Beadcats are said to be the beaders who named the stitch.
But here is the fun part. I then found a second post on BeadingDaily by a beader, who also studied art. She noticed that the pillars were actually the work of Gian Lorenzo Bernini who created the columns in question for the alter in Saint Peter's Basilica (right). So does that mean that we should be calling it the Bernini Spiral? I don't know about you all, but I'm going with Bernini Spiral.
Many months ago I saw a post from Karen Williams over on her blog Baublicious. She was looking for beaders to work on freeform projects, including taking pictures through the process so she could featuring them in her new book Explorations in Freeform Peyote Beading.
 I am pretty new to freeform beading, having only created a handful of designs. I thought, "sure I could work on a bracelet." But then after talking to Karen she asked if I would be willing to create a necklace since so many people submit bracelets for freeform designs.
I had never done a necklace, and I was just so unsure of how I would design something with such a large canvas in a freeform style.
 But then inspiration hit. I had been home visiting family in Oregon and stopped into a local glass blowing studio called Fern Hill Studio that I've mentioned a few times now on the blog. The pieces of glass I bought were cast offs from large glass pieces made at the studio like vases and bowls. But the little snips of glass I thought were perfect for cabochons. The owner let me buy a bag full of them!
What I wanted to do with my little pieces of glass was to create a piece inspired by the bubbles that form in the surf along the Oregon coast. The waves there are rough and crashing creates a bit of foam along the shore. I love how the water swirls in the surf around the bubbles floating right next to the water's edge.
I did share a lot of photos with Karen as this design was very organic to say the least. I had an entirely different final piece in my head. I thought I'd create a short collar necklace, but it just didn't hang the way I wanted and I ripped it out. I switched to beading around brass rings, which also overwhelmed the pattern. In the end I went with a simple braiding of sari silk in a fishtail pattern. It felt more like the sea to me.
There are lots of other artists in Karen's book, and full of ideas, designs and instruction on freeform beading. It is a beautiful book that does not disappoint; including some of Karen's signature beaded sculpture pieces that are truly stunning. Be sure to check it out!
 You gotta love when you find the Bead Girl sitting in your studio playing with beads and turns around saying, "hey mom look at this ... it's a bingo ball!"
I mean, what's not to love? It's rustic, antique looking, spins and makes noise with the beads flipping around inside. It looks kinda like the old metal bingo cage with the side crank. Those manual ones were great for getting a good turn to mix up the balls. Oh yes, the Bead Girl would love a go with that old-style bingo cage.

 But there was just one thing we were struggled with ... how exactly to cap off the ends so the letter beads didn't spill out? We tried a number of options; bead caps, large heshi beads, perhaps some messy wire wrapping? In the end we went with the knotted, weathered leather, which really seemed to suit the era.
We added some hand-made chain using silver connectors, a bit of my mom's old basting for ribbon around the back ... and there you have it. Bingo Ball fashion; Bead Girl style. I'm noticing that it might just be time for the Bead Girl to get her own logo since she's starting to create some serious designs. She has a at least two more I need to post. What do you guys think? Any suggestions as she establishes her signature labeling?
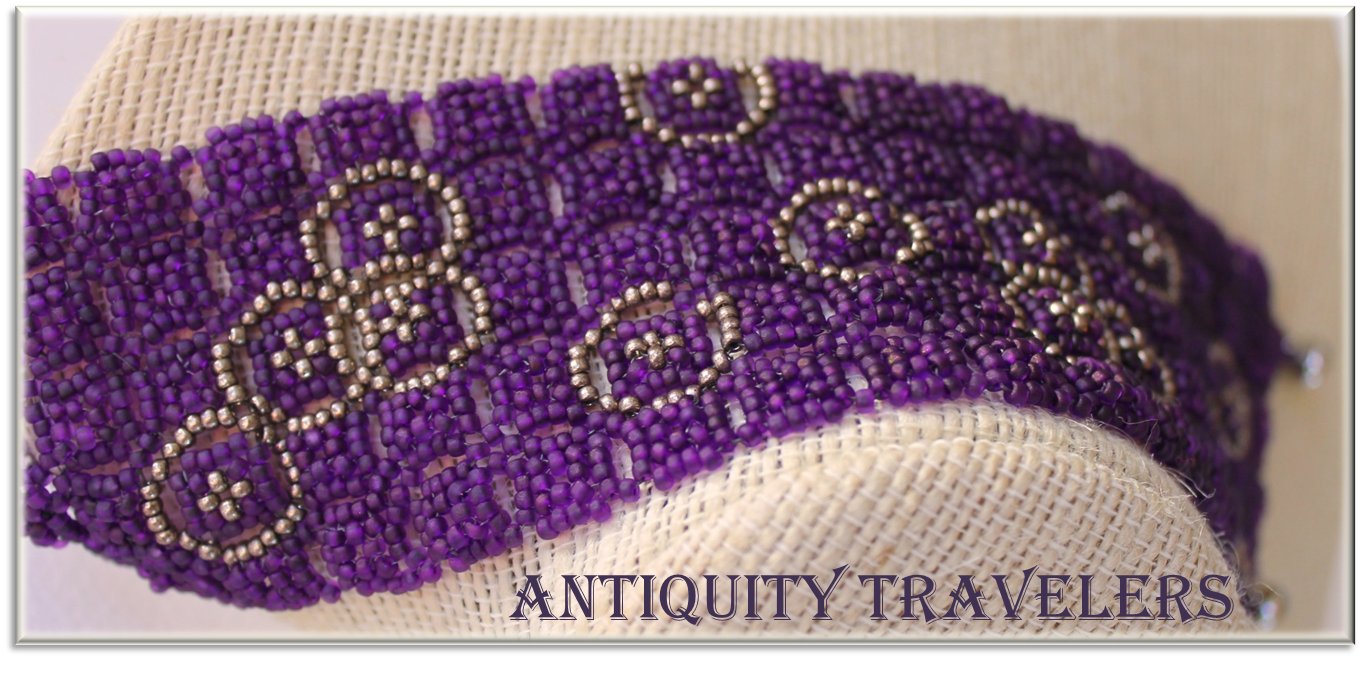
Today is my 21st wedding anniversary, and what better way to celebrate then to show you a bracelet I just finished with a pattern that looks like the wedding ring quilt pattern.
I love this pattern. The bracelet is rhythmic to make, and lately I've been needing that to relax. I made another version of this pattern back in August, but this one is purple ... my hubby's favorite color. Not that he's going to wear it; this one will be available over on my Etsy site.
It always amazes me to think how long my husband and I have been together as it feels like yesterday that I met him. But then I can't remember my life much before I met him. Funny how life works that way...how someone becomes such a part of your life. And if you're lucky enough to have kids, what a wonderful experience it is to see them grow. Not just physically, but becoming people. And people that are part you, and part your husband. Such a blend of us both. No one tells you life will be this way, or what deep, mixed emotions that brings on. Something I wouldn't change for anything.
 I haven't had a lot of time for blogging in the last few weeks with my pesky day job getting in the way. I have, however, continued to make a few things at night to unwind. Nothing complicated. Usually just something rhythmic in my hands that helps me relax at the end of long, long days.
 I felt like making something earthy, and a bit raw like what I was seeing outside these days. I grabbed some gorgeous veined stones I bought back in August at Beadfest. I was at one of the vendors, can't remember the name of it, and I saw strands, and strands of stones for 50% off. I just could not walk away. I'm pretty sure these are jasper, but what type? I lost track in the frenzy that ensues with 'beads' and '50% off' in the same sentence. These greenish-grey-black stones were perfect to pair up with a set of tooled leather ends I got from Melinda Orr. Aren't they amazing? I love the green, earthy leaf pattern. I punched a few holes and strung the stones straight into the leather. This one feels substantial around the wrist and stacks in a lovely multi-layer of stone strands.


 So when did ombre become such a big thing? I hadn't realized it was until my daughters were asking for clothes that were 'ombre.' I wasn't sure what it was exactly that they were asking until they explained "you know mom, it's graduated colors." As if everyone knows that. And yes, my 12-year-old used 'graduated colors' in her definition.
 But see that's the thing. I never thought of ombre having to do with color. The word always reminded me of those old Westerns. The ones with a poncho-wearing Clint Eastwood that would talk through his cigar; saying just a handful of words as he squinted at the sun.
 So how did this definition become known in the fashion world for the graduation of color tones? Apparently that definition comes from the French for 'shade' ... which was then applied to clothes, hair or even art when using graduated colors.