Showing posts with label BTW. Show all posts

Wednesday, September 11, 2013

On the Bead Table :: Tilas

After Bead Fest, it is hard to know where to start with digging in to the stash. So I thought I'd warm up with a simple little design of tilas and micro seed beads. Nothing too fancy, but sometimes the simplicity of a piece is enough.

I picked up a bunch of brass connectors at the show, which I knew was going to fit right into my repertoire. I think these give the piece that Egyptian feel; fit for a queen. Hmmmmm, maybe that's what I'll have to call this one: the Cleopatra Cuff.

I've got some earrings that I made that match this cuff that I'll be sharing this weekend in Shel's Pearl Blog Hop. Be sure to stop back by and check them out.

Wednesday, May 22, 2013

Featured :: ZnetShows Sea Glass

I've got a lot of sea glass from ZnetShows on the bead table at the moment. In fact I kinda have it all over the place with pieces in varying levels of 'done-ness.' Much to my family's chagrin. 

I'm working as quickly as I can to plow through the patterns, but just as I'm halfway through one another pattern seeps in and I need to start that project so I don't lose the idea. Yeah, I know, it's kinda a sickness. But the ideas are just pouring out as I play with this wonderful sea glass!

I think this freeform piece might just be my all-time favorite. Not sure why exactly since I had a bit of a throw down wrestling with the pattern. It was all good in the end. The cream, matte beads seemed to pick up the texture of a starfish and the orange sea glass are like windows beckoning both sides of the cuff. It is uniformed when looking at the whole piece, but pull up close and it has the uniqueness you'd find on the surface of a starfish, or snowflake that only a freeform pattern can do.

I used a number of stitches in this one. The main one being freeform peyote, but I also used ladder and brick with some larger square beads. I also continued this freeform stitching for the bezels around the sea glass, and brought in some micro seed beads to create a bit of a dainty pattern around the edges. I am still working on the closure, but I will most likely use my most recent zig zag pattern to give it a continuous feel. 

I have been trying to find my groove with freeform, but I have struggled with feeling like I am suppose to create a somewhat 'messy' pattern. But my big epiphany with this piece is that there are no rules, and who says you can't have a little structure to freeform? I still stitched organically across the pattern, but I used some structured elements too. I think this might actually be my comfort zone with freeform beading.

Wednesday, May 8, 2013

BTW :: Spirals!

The Time to Stitch challenge 3 is going to be dominating my blog for the next week, just to warn you! I have been practicing like a crazy person, and now it is time to start revealing some of the work. 

I'm going to start with the bead table: and that means spirals. The first spiral I learned was a Russian Spiral, which has become my go-to pattern when thinking about spirals. The one here is using coral rounds. You can see I'm mid-pattern, and you'll have to come back tomorrow for the reveal of this one. 

The second one is a Cellini Spiral. A stitch that has stopped me in my tracks historically. But I was determined to figure this baby out. I pulled out every bead pattern book I own and worked on this stitch with all of them (and I mean all of them) open as I attempted to figure this one out. Then I decided I was just going to have to break down and watch a YouTube video on the matter. I started it, then stopped it. Then started again, and back up the video. Then ripped out the pattern and started again. After 3 hours of this, most of my family had had enough of this wacky lady listening to a repeating video on beading ... that they all headed to bed. It was slow going, but by midnight I had finally figured it out. I know I need practice, but this is a big jump in my learning curve. Stop by next week to see the reveal on my Cellini Spiral.

This is the kick off to my beadweaving series that I'm running this week for the upcoming A Time to Stitch Challenge by Christine of One Kiss Creations & Therese of Therese's Treasures. The Blog Hop reveal is next Wednesday, May 15.

Tuesday, April 30, 2013

BTW :: Rutilated Quartz

Did you know that quartz is the single most abundant mineral on earth? Or that it makes up 12% of the earth's crust? I didn't until I went looking for the causes of Rutilated Quartz, which is the stone in these earrings. 

Rutile are inclusions that form in long thin needles "frozen' inside stone such as quartz, but also known to cause the 'star' in sapphires and rubies. Huh, who knew? It is formed when rocks start to cool after being heated by high temperatures and pressure. The pressure eases and the stone separates creating rutile crystals trapped inside the quartz. 

These rutile quartz earrings have a black inclusion, but I've seen others with deep green. Both black and green are tourmaline deposits within the crystal. I just love the patterns they make in the stones. That's what's on the bead table this week.

Tuesday, March 19, 2013

BTW :: Out Like a Lamb?

Well I certainly hope that March calms down sometime soon. Tomorrow is technically the first (official) day of Spring, but seriously? It snowed again last night, and I shoveled my car at 5:45 am. Yep, it was still dark outside.

Isn't the weather suppose to be changing from 'lion-ness' and into the soft spring 'lamb-ness'? 

Where does this term "March comes in like a lion and out like a lamb' come from? Newsnet said it is from the constellations. That in the beginning of March the Constellation Leo (lion) is crossing toward the meridian, and as the month comes to a close, the Constellation Aries (ram / lamb) begins to rise. That is kind of a cool definition. But it still doesn't help me with the fact that there is snow on the ground ... still.

My BBA group decided that this month we'd create with softer, warmer spring colors. The colors of flowers and trees beginning to show their buds. Ok, well I can handle that. So I pulled out some 'sprout' green and hyacinth blue ... along with a pretty Chinese enamel butterfly bead. I start to bead rows of soft green. My Beady-Bloggy friend Christine recently showed me a great new pattern (well new to me) that I decided to use for this bracelet. I love this pattern, and at least it feels like spring on my bead table.

Wednesday, January 23, 2013

Soutache On The Bead Table :: Lady Gray Cameo

Artisan Whimsy challenged us to try out a new technique called Soutache (pronouced SOO-tash) and is referred to as Russian Braid. It is a beautifully flowing stitching technique with layers of trims, braids and tassels; developed in the 16th century. The trims are stitched flat in a combination of sewing and bead embroidery with the trims 'stacked' to create a stronger visual with the beads in a series of curves. 

I found inspiration on a few sites from Poland, Hungary and Romania. If you want to see some amazing eye candy check out this site by Aurus.

I have done quite a bit of sewing, embroidery and beading and when I saw the call to learn this technique I thought I'd be able to master it quickly. But that was not the case; I can't even bring myself to show you my first attempt. What I can tell you is that every little niggle with your stitch shows up. 

I started the project weeks ago, and put it down as I was too frustrated to try again. I finally picked it back up again a day ago, and it went along much more easily this time. I decided to let the trim fall into its place naturally as I stitched along. This worked so much better - and faster - for me. I also decided that instead of trying to work in multiple colors, I wanted to focus to one color and let the central focal take center stage, which worked better with what I had in mind. I wanted to do something that was a little more Victorian and thought a cameo would be the perfect focal.

This piece is still on my bead table. I need to put the backing on and add a few more pearls. I also need to decide if this will be a choker or a necklace, and if I want to use ribbon, velvet or a beaded stitch. I'm going to let it sit for a few days, but I'm so glad I tried this again! I would recommend checking out the recommended site for materials and tutorials if you want to try Soutache; Amee Runs with Scissors.

Wednesday, January 16, 2013

On the Bead Table: PJBeads

Early December I was at a bead show and stopped by Patricia Dugmore of pjBeads booth. She has such a passion for making lampwork glass beads, and in her words she says "The journey and discovery of glass is just as exciting today as it was on the day I took my first class." That was in 2003; a mere 10 years to hone such a talent. 

I picked up quite a variety from her as her beads were just so gorgeous. I could not help but stand there sifting through the baskets of multi-colored glass. My partners in crime (Christine and Sally) were right there beside me; just as mesmerized as I was. So you'll definitely be seeing more from me using her beads in upcoming earring designs. 

The pattern of each bead is its own custom design in red, black and olive green. My picture-taking skills (or lack there of) just don't do these justice. The colors are just stunning. I paired them up with some hammered silver to create paddles for my onyx rondelles. I haven't made paddles before, but found them easy to create. This is a second pair in a series of artisan bead earrings that I'm working of for the AJE Earring challenge.

Wednesday, December 19, 2012

Native Peoples :: On the Bead Table

As I wind down my Van Gogh Series, I've been thinking about another one. One inspired by nature and native peoples. I recently met up with some bloggy friends (Christine and Sally), which was just so much fun to get to know them better in person. Christine gave me a few pieces from a trip where she picked up some great rocks from the shore of Lake Michigan. And now I have ideas swirling in my head for a new series. 

This piece is currently on the bead table. I posted it on CBC (Creative Bead Chat) last night to see if I could get some inspiration on how to finish this necklace. I got suggestions from knotted suede, to beaded spiral rope to simple stringing. I'm still thinking it through.

Until then, I'll leave you with some iconic pictures of Native American culture: the headdress. Not all tribes wore a headdress, but those that did typically reserved the right for the tribe leaders. The ones shown here are Sioux. They were mostly ceremonial, worn with pride, as another feather was added for each brave act by the person wearing it.

A little known fact is that women did not participate in making the headdress. Only men. Usually it was the privilege of the chief or the warrior's closest friends and allies. Of all the feathers, the golden eagle feather was the most coveted. It brought great reverence and respect from the rest of the tribe. The colors of the feathers depended on what birds were indigenous to the area, and the strap on the headdress typically made of leather. Ha! I believe we have our answer to how I should finish my necklace. I am now off to find just the right piece. I'll be back with pictures.

Wednesday, November 14, 2012

BTW :: Challenge of Color


I am really excited to be joining Erin's Challenge of Color Blog Hop. Her theme is Earth as Art, and these are my photo inspiration. On the right is Guinea-Bissau and on the left is the Empty Quarter. Both are amazing ... I simply love the richness to the selections. 

I spent several hours playing with beads last night trying to get just the right color combinations to bring out the earthiness to these pallets. You can see my bead table in the center, and all the beads I'm pushing around as I play with beading patterns. If anyone has any obvious beady ideas please don't be shy and shout it out at me!

Tuesday, October 9, 2012

BTW: My Bead Table Challenge

This Saturday there's a blog hop set up by Lisa Lodge over at A Grateful Artist - Pine Ridge Treasures. Several weeks ago we all signed up for a bead soup from Lisa's bead table. She wanted us to try to use what we had already sitting on our own bead tables. You know ... all those beads we all have scattered across our own tables? I always seem to have about 5 or 6 'almost' finished pieces in progress. So I had plenty to work with. I even started blending some of the pieces from one challenge to another. Oh no .. is this a sign that I need to go on a "challenge diet?" Say it isn't so!

What you see here is the soup that Lisa sent me, and I'm working away at finishing up a few pieces to show you on Saturday. Stop back and see mine, and all the other people participating in this hop. So until then, this is what is on my bead table this week.

Wednesday, October 3, 2012

BTW: Using Pillow Cord

My latest boho-inspired design uses a mix of beadweaving and bits from my sewing box. 

I hit a sale awhile back and picked up a few yards of this, and a few yards of that. I was thinking pillows. So I also bought some cord to finish the pillows I had in mind. The thing is ... the fabric is still very nicely folded and stored away. But I started thinking that I just might have another use for that cord. 

I pulled out a bit of the cord, and matched it up to some pretty purple matte beads that I realized would make a beautiful trim to a boho bracelet. I started with a peyote band and stitched it into one of the pillow trim cords. I fit a matching piece to the other side and stitched that in on the other side. Then I created a hand-hammered hook that I slipped into one end of the bracelet and added a woven hook on the other side. 

It is a simple cuff, but fun and comfortable to wear. I really like this new pattern and I'm working on adapting the pattern to other stitches, colors, beads and cords. This style will be back.

Tuesday, September 4, 2012

BTW: Creating with Ribbon


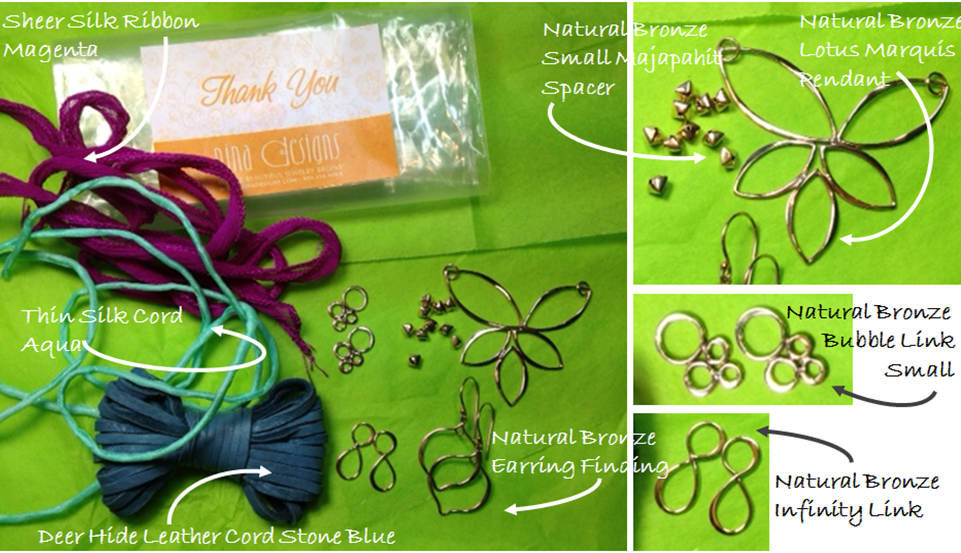
On my table this week are the remains of the package that I received from Nina Designs. You can see the full loot here, but this week I'm focused to a few necklace designs.

I'm starting off this week's necklace series with a pretty pendant that I wire wrapped in a variety of Swarovski beads: bicones, a couple of squat bicones and a cube. I have lots of these pink beads in my stash as my oldest daughter has always favored the color pink. So I regularly pull them out when I'm creating a piece for her.

I also used a beautiful magenta silk ribbon (from Nina Designs) to connect the necklace and to kick up the color of the piece. As a final accent I used a pretty swirl toggle, a handmade gold chain I created with a few more pink Swarovski beads and a few spacers from Nina Designs. I had my daughter try it on when I was done, and it looked so pretty on her. Now if only I could get her to wear a dress!

The materials above were provided as part of the Nina Designs blogging program. The author of this blog has not received any payment from above-mentioned company. The post above represents only personal opinion of the blog author. 

Tuesday, August 28, 2012

BTW: Nina Designs

I don't think I could be more excited to tell you that I received a goody bag in the mail from Nina Designs. Several weeks ago I sent a note inquiring about becoming a blog partner.  I heard in the beginning of August that they were sending me items to create with, and when they arrived I literally gasped. They were more beautiful then I imagined! The findings are gorgeous, silk and sari fabric, and the blue leather is so amazingly soft. I just couldn't wait to get started.

I've been itching to get back to my studio and start working with these pieces. I have been traveling for weeks, and this past weekend was the first time I've been home in my own studio in over a month. 

I'm going to do a series over the next couple of weeks to talk a bit about each design -- starting Thursday. So, swing back by my blog to see my first earring design.

The materials above were provided as part of the Nina Designs blogging program. The author of this blog has not received any payment from above-mentioned company. The post above represents only personal opinion of the blog author. 

Wednesday, August 22, 2012

BTW: The 'Just Right' Black Earrings

So my sister-in-law asked for a simple pair of black earrings for her birthday this year. But the most important part of any story about my sister-in-law is making sure you understand exactly what she's asked for. She is not one to hold punches. If she doesn't like something you can see it all over her face, and she'll be sure to throw in a few choice words. THE most difficult person in the family to shop for.

It's become a bit of a game with us in the family to see if we can 'get it right.' My poor mother-in-law has returned more items than I can count. But I've been batting 1000 lately. so I'm feeling like I'm on a role.

When she asked for black earrings, I thought 'ok, I got this.' How hard can that be? But before I could finish that thought, she added 'you know, not too fancy, just something simple, certainly not pearls, not too long ....' That's when you know you're in trouble; when she starts listing stuff. It becomes a bit 'Goldilocks' with a 'not too hard, not too soft' guessing game. 

At this point I had already set out a few items on the bead table ready to create. I had a pretty little pair of spinel briolettes. I really like this stone. It has such a beautiful hue to it; especially with the faceted cut. But I decided that these might be just a little too small, too shiny (aka fancy) and without a complete closure. She also loses earring backs as quickly as I give them to her. I was thinking about getting her just a box of earring backs for Christmas.

Ok so pair number two I decided on a nice tear drop onyx stone. I did a long double wrap over the top and included a straight (nothing fancy) leverback. Sans the need for earring backs. This pair seemed just right to me for everyday. But just to play it safe, I did make a third pair. I had been meaning to replace my own black pearls, so I thought if she doesn't like these then I've got my new pair. Two birds with one stone; wait that would be four stones. 

I gave them to her this past Saturday, and as expected, the onyx pair was exactly what she wanted. Whew, still batting 1000!

Wednesday, August 15, 2012

BTW: Boho Leather Hoops

I am continuing to find inspiration in Lorelei and Erin's new book Bohemian Inspired Jewelry.  And, as with any recipe, I never follow it exactly. I typically take elements and mix things up a bit. 

One of the projects in the book uses 'leather fringe' on a pair of hoops, and I just had to try that! It really wasn't very hard. The hardest part was keeping the leather gathered together on the hoop, and so I needed to ensure I had a tight wrap on either side. 

I started with a scrap piece of leather I had left over from an upholstery project. I cut it about a quarter inch wide, and roughly 3-4 inches long. I then used a hole punch and spaced holes roughly a half inch apart. 

Once the leather was threaded I twisted it just a little to give the 'fringe' effect shown in the book. Lastly I added a flat silver bead and did a quick wire wrap (about 5 full wraps) which gives it a very secure hold. Also, to hold the wire in place I had wrapped it at the end of the fringe and threaded it through the bead along with the hoop. I originally thought about including pearls to the hoops to match the leather and pearl bracelet I made a few weeks ago. But it was just too much. I think I prefer the simplicity of the leather and silver.

I did also make my own hoops. I used a thick gauge (15 g) solid silver wire. I grabbed a spice jar, created a loop at one end and bent the wire. Then just added the hook to the other end of the hoop. A quick couple of whacks with a chasing hammer did the trick. 

These were really easy and fun to make. I'll bet I could use other thick ribbon or velvet? hmmm ... already thinking of variations.

Tuesday, August 7, 2012

BTW: Bohemian Inspired

Lately everyone is buzzing about Lorelei and Erin's new book Bohemian Inspired Jewelry. I have to admit that I have read it through at least 6 or 7 times now and have started to use it to inspire some of my upcoming pieces. Like this blue cord necklace on my bead table this week.  

A week or so ago I was over at Kashmira's blog and loving a new pendant she had just created with beautiful knotting. She pointed me to Lorelei and Erin's book, and I realized that there are so many techniques they use that I am loving. And that photography is so wonderful --- eye candy to a beader. My husband laughs at me with my nose stuck in one of these books and completely ignoring him. I can get lost for hours in a good beading book.

I've been trying my hand at a few of their techniques, and once I get going they truly inspire all kinds of ideas for me. I have had these glass discs in a bead drawer for years now. And realized that the knotting that Kashimra was doing would work so well with these. I also had some beautiful silver balls, yes also in a drawer for much longer than I'd like to admit. A little polishing from a sliver cloth and look at them shine! There will be more to come with these knotting techniques. I'm just getting warmed up.

Next, I grabbed some spare leather that I had sitting around from a chair I recovered some 15 years ago. I figured eventually I'd find some use for it. Some of the leather that they use in the book is so unique and gorgeous I just have to try it. So I've got my shears and leather all spread out for the next project. Look for more pearls and leather coming soon from me ... they will match my Glam meets Boho pearl and leather bracelet.

So at the moment my bead table is covered in Bohemian inspired work. That will keep me beading for weeks ... I just have to find time to stop and blog a bit to show you all.

Wednesday, August 1, 2012

BTW: Glam Meets Boho

A little over a year ago I began my adventure as what's known as the train jeweler. There are older posts (this one or this one) that takes you through the origin of my commuting crowd calling me this. But what started it all was my Turkish friend asking me to create a pretty bracelet from the Sundance catalog. I almost never follow a recipe exactly, and my beading is the same. But I did like the idea of creating a bracelet that was a little elegant, a little boho. That is how this pattern came into my repertoire. 


The original bracelet is the one with the darker suede, which I found difficult to work with as it kept breaking in my hands as I knotted, or sewed the loops. Sigh. I did manage to finish this first version of the bracelet, but with much swearing. Kids, cover your ears.

Months later I was at a gorgeous Japanese ribbon store (Mokuba) where I spotted a synthetic suede that works like a dream. I normally hate anything synthetic, but I have to tell you that this stuff feels like the real thing. And the best part is that it holds up to the roughest beaders - that would be me. You can see the Mokuba version in the lighter suede ... wouldn't you agree that it looks gorgeous! A bonus was that it was about $2 a yard. what? I mean no brainer for me.

I forgot about this bracelet until a week or so ago when my Turkish friend came to me and said that she really wanted the bracelet to be a tad smaller. I took one look at the bracelet and remembered how much I loved this bracelet. But also how difficult working with real suede (a thin strip of it) can be. I decided not to pull it apart, and I would keep her's as is for myself. And for her I'd make a new one - enter new suede! So she has the new one with the lighter colored suede, and I kept the original one in the darker color. That's whats on my beading table this week.

Friday, July 27, 2012

Freedom Fridays: Peyote with Spirit Bead

Recently I received a large hat-full of beach glass from my sister-in-law who had been visiting the Maine Coast. She pulled out a small aqua piece of glass and asked if I could make something with it? Hmm, it is pretty small. So this might take some creativity to figure out how to include this.


At the time I had been working on a beaded bracelet and she commented on how much she liked the blue colors of the beads. So I thought I'd try to combine the two. Originally I tried a beaded bezel around the piece of glass, but it is simply too small and left very little of the glass to see once complete. Ok, so scratch that. I also considered gluing a silver piece with a loop on the glass that I had used recently on beach glass pendants. The only problem was that the leaf design on the piece would have covered the entire surface of the glass. So I created my own hammered silver to wrap around the glass and glue into place. I decided to use it as a charm hanging off a custom hammered silver toggle. I wanted to create a special piece for her to remember her trip back East this summer that she could wear and remind her of her time both at the Maine shore and her time with us up in the Adirondacks.


The other design element I used was the Native American tradition of peyote and a spirit bead. I've been enjoying reading a book I recently picked up by David Dean called Beading in the Native American Tradition. It is a fabulous book that takes you through all of the various bead stitches used by the American Indian tribes like: gourd stitch (peyote), the Comanche stitch (brick), lane stitch (from the Cheyenne, Crow and Sioux) and loop stitch (Cheyenne), running stitch (Crow). Just to name a few.


Specifically he talks about Peyote and the origin of the stitch. The stitch is also called the Church design. Native American's used beaded feathers (gourd stitch that wrapped around the handles) as part of the peyote ceremony that involved prayer and the peyote cactus as sacrament. The bead stitch associated with their 'church' rituals was said to be done in the 'peyote' style. 


The other tradition used by Native American beaders was to include a 'spirit bead.'  This tradition dates as far back as 800 A.D. and served as talismans against threat.  The spirit bead is one that stands apart from the rest of the pattern; sometimes a bead of a different color. Native Americans believed that each piece should contain an intentional mistake (or spirit bead) somewhere within the pattern because humans cannot achieve perfection. If we attempt perfection it could be bad luck. And the spirit world would not enter into anything that was flawless. So a spirit bead was sewn in among the others to provide a flaw where the spirit could enter and flow through the beadwork. A spirit bead is a reminder anything created by human hands cannot be perfect. These Native American beaders would intentionally include a wrong colored bead as a way to honor the Great Spirit and express humility. 

Wednesday, July 25, 2012

BTW: Herringbone

I have been on a bead weaving kick lately. After joining the 'Time to Stitch' blog hop, I've been pushing myself to do more bead weaving, and one stitch that I've been avoiding is herringbone. I had tried it a few times, but couldn't quite get the hang of it. But this time around I pushed myself to just keep going, and found that this is actually a fun stitch once you get going. 


I got hung up on how to finish the bracelet. I wanted to use a ribbon clamp, but that is tricky with glass beads. While of course I tried it, I broke several beads in the process. Sigh. Right, rip out, restring a couple of rows, and start again. Yes, a clamp with glass beads is a bad idea.


I decided that perhaps if I stitched some suede at the end of each side of the bracelet it just might work with the crimps. Okay, now we're talking. But I didn't like how the thread stitching looked on the suede, and so I added florets of beads just at the edge.


The other hurdle I found was trying to keep the toggle short. Given the size of the crimps; I thought it would look too awkward with a large, or long toggle. I decided to create my own eye and hook closure. It was easy to make, and turned out to work quite well. So, that is what is on my bead table this week.

Tuesday, July 17, 2012

BTW: Playing with String

I have seen lots of tutorials lately for fun wrap, or slide bracelets. And as I looked through the patterns, it seemed like it should be pretty easy to make any one of of these styles. At least that is what I thought before I got started. As easy as it looks, I think it is going to take more practice before I really get the hang of it! 


I decided to give a couple of the patterns a try. I started with medium sized wooden beads. I like this pattern with the darker twine becoming part of the pattern itself. My tension needed practice, and so I decided that maybe I should try a slightly larger bead. I moved on to porcelain flat rounds. While I like the look of this, when it is lying flat, it is tricky to keep the beads flat when beading. This also can make the pattern uneven.


I did try various types of twine or thread ranging from stiff twine, to pliable cord to waxed beading thread. I think I prefer the later to work with, which is what I used on the final slide knot style. While I had more luck with this pattern, I will say I ripped out the slide knot at least 3-4 times before I felt like I understood how to make this closure. I used to do a lot of macrame when I was a kid, and this pattern reminds me of some of the classic knots and wraps. So that's what's on my beading table at the moment. Just some practice pieces. I'd love any tips or tricks from the 'stacked and wrapped' crowd out there!

AntiquityTravelers on Etsy